


Setting up a home development server
This set of guides will take step by step through the installing and testing process for a complete set of development tools on windows.
All the tools are industry standard tools and once set up on your home pc you can build and test your site at home, ready to upload to the live site.
I would suggest that you install apache, perl, php and enable ssi as a bare minimum, in that order. Mysql and phpBB are really useful extras that I thought you might like to fiddle with :)
The default install of programs tend to get spread all over the place so for this guide I suggest you create a folder called web as the main installation folder for all your server tools e.g.
- C:\web\
- D:\web\
- E:\web\
It is important to note that this guide is written assuming you install the the tools into DRIVE:\web\ Different install locations will work, it just means you may have to change some paths etc in config files.
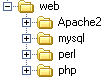
When you are finished your web folder should look something like this
I have defined a sensible install order. For a trouble free setup I would suggest you follow this guide step by step. Jumping back and forth could cause you to overlook something.
What are the benefits of setting up a development server?1. You can build, update and test your site without constantly uploading changes to the live server to test things. It's better to fix all your mistakes before you upload them and it saves time :)
2. Many users still connect to the net via dial up so you can save money by developing your site offline.
3. Use the development server as a mirror of your live site. If you are writing new content then do it on the development server first. I have an exact copy of all my sites on my development server and that's where new sections are worked on. Once I have verified the content and the links then I upload them - I know they will work (I still test on the live site and so should you:)
4. Minimise live site problems and disruption. By being able to test your site locally in your browser as you would the live site - you reduce live debugging.
The whole process is fairly straight forward. I wrote the guide at the same time as I was installing and testing all the software, so it should work for you, if you follow the steps as I did. For this guide I installed all the software onto windows xp but I have an identical setup up on windows 98 and have also tested on windows 2000.
So let's begin by downloading all the software
Setting up a home development server
Step 1 Download all the software
Step 2 install and test Apache
Step 3 install and test Perl
Step 4 install and test php
Step 5 enable server side includes and test
Step 6 install and test mysql
Step 7 install and test phpbb
Step 8 well done
Get your questions answered quickly.